
VERIFONE COMMANDER TRUAGE CONFIGURATION
Requirements:
-
A compatible 2-D scanner is required in order to scan the drivers licenses and the TruAge QR Code.
- Verifone Commander BASE 55.02.04 or higher software is required for TruAge to be enabled.
NOTE: BASE54.02.04 has the ability to run TruAge with Drivers License only (can not scan QR codes)
NOTE: BASE 55.02.09 has the Penny Rounding feature and is the last version that supports the Topaz terminals.
Setup Process:
- Add TruAge Host URL’s to your firewall rules for your MNSP device
- Add all of the host URL’s to the firewall rules.
- NACS TruAge Production Environment
- https://admin.truage.host – 34.149.106.178
- https://router.truage.host – 34.107.243.142
- https://tas.truage.host – 34.111.31.86
- Port: 443
- Configure the Verifone Commander for TruAge
- Create and Setup Your Unique Device ID
- You will obtain this Unique Device ID from the Store -> Device setu in the TruAge Portal.
- In the Commander Configuration step you will need to enter a Site ID, it is also referred to as the Conexxus Site ID in some documents.
- This is a unique device id for each Commander system, it is an alphanumeric field.
- It can be all lowercase letters or all uppercase letters or letters and numbers.
- An example of a Device ID might be: STORENAME123 or just the initials of the store name: SN123.
- Create network routes needed for communication to TruAge Host
-
On the Commander, you’ll need to add host routes for each TruAge server. Please log into the Config Client, go to Initial Setup, then Local Network Settings (name may vary). You’ll need an OTP to access this screen. In the routing section, click Add and create the following three host route entries:
Route 1
-
Host: 34.107.243.142
-
Gateway: 192.168.31.31
-
Mask: 255.255.255.255
-
Service: TruAge Router
Route 2
-
Host: 34.149.106.178
-
Gateway: 192.168.31.31
-
Mask: 255.255.255.255
-
Service: TruAge Admin
Route 3
-
Host: 34.111.31.86
-
Gateway: 192.168.31.31
-
Mask: 255.255.255.255
-
Service: TruAge TAS
After adding these, click Save (you may need to scroll up to find the button). The system may prompt you to reboot, but a reboot is not required for routing changes.
-
-
- Configuration\Store Operations\Restrictions
- Uncheck Local ID Checks, so you don’t get prompted for ID Check twice.
- Check Online Age Verification.
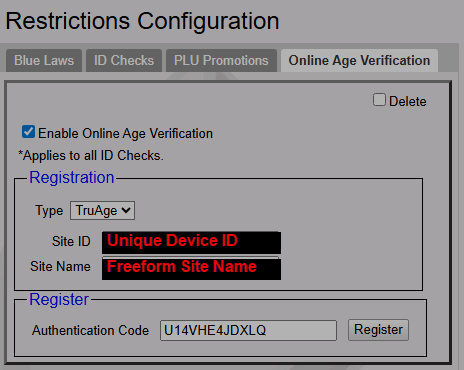
- Enter the Site ID. This is the Unique Device ID from the device setup in the TruAge portal.
- Enter the Site Name. This can be anything you wish to use to name the site.
- Enter your Authentication code from the device setup in the TruAge portal and click on Register.
- After your Commander is registered with the TruAge host you will see the date and time.
- Create and Setup Your Unique Device ID
- Date of Birth (DOB) on Sales Journal
- To view the Date of Birth on the sales journal, the “Print DOB on Journal” must be enabled from Store Operations > Sales > Sales Configuration.